Remita Receipt 2026: Generate, Download & Reprint in 2 Minutes
Your Remita payment is done. The money left your account. The institution is waiting for proof.And now you need your receipt.
For many Nigerians this is where the confusion begins – not the payment itself, but what comes after. Where does the receipt go? How do you get it back if you closed the tab? What if you never downloaded it in the first place? What if you no longer have your RRR?
This guide answers all of that. It covers every receipt scenario – first-time download immediately after payment, reprinting a receipt you previously downloaded, recovering a receipt when your RRR is missing, and what to do when the receipt shows the wrong status. It does not repeat the payment or RRR generation process covered in the companion guides – it starts from the moment your payment is complete and takes you through to a downloaded, printable, institution-ready receipt.
What Is a Remita Receipt and Why Does It Matter?
A Remita receipt is the official proof that a payment made through the Remita platform was received and acknowledged. It contains all the details of your transaction – the amount paid, who you paid, the date, your name, and the transaction reference.
This distinction between a receipt and a payment confirmation is important and frequently misunderstood:
Payment confirmation is what your bank gives you – a debit alert, an SMS, a bank statement entry. It proves your bank moved money. It does not prove Remita received and processed it.
Remita receipt is what remita.net issues – a PDF document generated only after the payment has cleared the Remita settlement system and been acknowledged by the biller. It proves the institution received your payment.
For government agencies, universities, JAMB, NYSC, FIRS, and every other institution that collects through Remita, only a valid Remita receipt is recognised as proof of payment. Many government services, institutions, and organisations in Nigeria only recognise payments confirmed by a valid Remita receipt. Your bank debit alert alone is not sufficient.
Thousands of Nigerians still visit cybercafés or agents just to print a Remita receipt, often charged between ₦200 and ₦1,000 for a simple receipt that can be downloaded in less than five minutes. This guide eliminates that cost entirely.
Nigerian Digital Lending Intelligence Report 2026 Best Value
How Do I Get My Remita Receipt?
There are three ways to get your Remita receipt depending on when you are trying to retrieve it.
Method 1 – Download Immediately After Payment (Fastest)
If you just completed a payment and the confirmation screen is still open:
Step 1 – On the payment confirmation screen, look for the “Download Receipt” or “Print Receipt” button. It appears immediately after a successful transaction.
Step 2 – Click it. Your browser downloads a PDF file – this is your official Remita receipt.
Step 3 – Save the PDF in at least two locations: your phone’s downloads folder and your email (forward it to yourself). As soon as you make a Remita payment, download and save the receipt in multiple locations. The confirmation screen does not stay active indefinitely – once you navigate away, you need your RRR to retrieve the receipt again. eBills
Step 4 – Check the receipt before closing anything. Confirm that it shows:
- Your full name
- The correct biller name
- The correct amount
- The word “PAID” or “Successful” as the transaction status
- A transaction reference number
Always double-check that the receipt says “PAID” before presenting it to any institution. A receipt showing “Pending” is not valid proof of payment.
Method 2 – Reprint Receipt Using Your RRR (Most Common)
If you already paid but closed the confirmation screen without downloading, this is the standard retrieval method.
Step 1 – Go to www.remita.net.
Step 2 – On the homepage, click “Confirm Payment” or “Reprint Receipt.” Both options lead to the same retrieval page.
Step 3 – Enter your 12-digit RRR number and click Submit.
Step 4 – The portal retrieves your transaction details and displays your payment status. If the status shows Confirmed or Successful, your receipt is available.
Step 5 – Click “Download Receipt” or “Print Receipt.” Your receipt PDF downloads immediately.
Step 6 – Save the file and verify the receipt contains your correct details before presenting it anywhere.
This method works at any time — one day after payment, one year after payment. Retrieving access to receipts even in the absence of the original file is simple with the Remita website as long as you have your RRR.
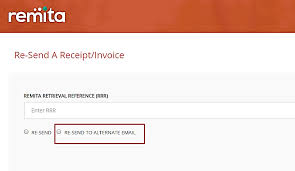
Method 3 – Resend Receipt to Email
If you prefer to receive the receipt in your inbox rather than download it directly:
Step 1 – Go to www.remita.net.
Step 2 – Click “Resend Receipt/Invoice” on the homepage.
Step 3 – Input your Remita Retrieval Reference in the provided box and click Submit. This action prompts the system to send your receipt to the email address associated with your invoice.
Step 4 – Check your inbox. The receipt arrives as a PDF attachment within a few minutes. Check your spam folder if it does not appear.
Step 5 – If you wish to send the receipt to a different email, select the option for sending it to an alternate email address. You will need to provide an alternate email and confirm the amount paid. This is useful if your original email address is no longer accessible.
How to Generate a Remita Receipt for Payment
A clarification on terminology that confuses many first-time users.
You do not “generate” a Remita receipt the way you generate an RRR. A receipt is not created in advance – it is issued automatically by the Remita system the moment your payment clears and the biller confirms receipt of funds. There is no separate receipt generation step.
What you can do is retrieve a receipt that already exists in the system – using your RRR through the Confirm Payment or Resend Receipt functions described above.
If someone has told you to “generate a receipt on Remita,” what they mean is: go to remita.net, enter your RRR in the Confirm Payment section, and download the receipt PDF the system already has on file for your completed transaction.
The receipt exists in the Remita system from the moment your payment was confirmed. Your job is simply to retrieve it.
If your payment is confirmed but no receipt is available: This is rare and typically occurs when there is a delay in the biller’s acknowledgement system. Wait two to four hours and try again. If the receipt remains unavailable after 24 hours of a confirmed payment, contact Remita support at support@remita.net with your RRR and bank transaction reference.
How to Make Payment with Remita RRR
This question appears frequently alongside receipt questions because many users complete the payment step and the receipt step in the same session – and some arrive at the receipt guide before they have finished paying.
The full RRR payment process is covered in detail in our dedicated guide: Remita RRR Payment: How to Generate, Use and Pay with Your Remita Retrieval Reference
Once you have your 12-digit RRR, you can pay through five channels:
Online by debit card – Go to remita.net, click Pay, enter your RRR, confirm the payment details, select Card Payment, enter your card details, and authenticate with your bank OTP.
Via internet banking – Log into your bank’s internet banking portal, navigate to Pay Bills or Remita, enter your RRR, confirm the details displayed, and approve with your transaction PIN or token.
Via USSD – Dial your bank’s USSD shortcode, navigate to Bills or Remita payments, and enter your RRR when prompted. Works without internet access.
At any bank branch – Walk in, present your RRR to the teller, and pay in cash or by debit. The teller processes it on their system.
Via the Remita mobile app – Open the app, tap Pay, enter your RRR or scan the QR code if available, and complete payment using your linked card or account.
After payment through any channel, return to remita.net and use the Confirm Payment function to verify the transaction and download your receipt. Do not rely on your bank debit alert as proof of payment for any Remita-based obligation.
How Do I Login to Remita to Access My Receipts?
You do not need to log into Remita to access a receipt. All three receipt retrieval methods – download immediately after payment, reprint via RRR, and resend to email – work as guest functions without a registered account or login credentials.
If you have a registered Remita account and want to access your full transaction history including all receipts from previous payments:
Step 1 – Go to www.remita.net and click Login at the top right.
Step 2 – Enter your registered email address and password at login.remita.net and click Sign In.
Step 3 – On your dashboard, navigate to Transaction History or Payment History.
Step 4 – Locate the specific transaction and click Download Receipt or Reprint next to it.
Your registered account stores every receipt from every transaction made while logged in – making it the most convenient long-term receipt management option for users who make multiple Remita payments regularly, such as business owners processing payroll or individuals paying recurring government obligations.
For a full guide to login problems – forgotten passwords, locked accounts, app access – see: Remita Login Problems? How to Access Your Account on Remita.net and the App.
How to Get a Remita Receipt Without an RRR
Losing your RRR does not mean losing access to your receipt. Retrieving your Remita receipt without the RRR is not impossible – the process becomes more involved but is still manageable.
Option 1 – Find your RRR in your bank transaction narration
If you made payment online via card or internet banking, the payment debit narration on your bank statement will contain the 12-digit RRR number. Check your bank app or internet banking statement for the transaction. The debit description typically shows the RRR alongside the biller name. Once you have recovered the RRR, use the standard Reprint Receipt method above.
Option 2 – Check your email inbox
When you generated your RRR, Remita sent a notification to the email address you provided during the payment process. Search your inbox for emails from remita.net or SystemSpecs. The RRR number appears in the subject line or body of the notification email. Check your spam folder if you cannot find it in your main inbox.
Option 3 – Use the Resend Receipt function with alternate email
If you remember the email address used during the transaction but can no longer access that inbox, go to remita.net, click Resend Receipt/Invoice, enter your RRR if you have recovered it, and select the alternate email option to redirect the receipt to a current address. You will need to provide an alternate email and confirm the amount paid.
Option 4 – Contact the institution you paid
Carefully review your bank statement for the transaction. Look for keywords like “Remita,” “Federal Government of Nigeria,” or the name of the agency you paid. Note the transaction date, amount, and any other relevant information, then contact the agency directly. Most institutions – universities, government agencies, JAMB – have payment records that can be matched to your identity and payment date even without the RRR, and can either confirm your payment or provide the reference needed to retrieve your receipt.
Option 5 – Contact Remita support
Contact Remita support at 0700-7877678 or email support@remita.net for assistance. Provide the payment date, amount, biller name, and your full name. Remita’s support team can locate the transaction in their system and either provide the RRR or issue the receipt directly. This option takes longer – typically two to five business days – but is reliable for recovering receipts from completed payments even when all other reference information has been lost.
Why Your Remita Receipt May Show the Wrong Status
Receipt shows “Pending” instead of “Paid”
A pending receipt is not a valid receipt. It means the payment has not yet been fully acknowledged by the Remita settlement system or the biller. This typically resolves within 30 minutes to two hours of a completed payment. Wait and check again before presenting the receipt or contacting support. If pending status persists beyond 24 hours, contact Remita support with your bank transaction reference – your bank account statement showing a successful debit alongside a pending Remita status is the key evidence for this type of dispute.
Receipt shows correct payment but wrong name
This occurs when the name entered during RRR generation differs from the name the institution has on file. This is a documentation mismatch, not a payment failure. Contact the institution directly – most will accept a receipt with a name variation if you can provide supplementary identification. In serious cases where the name is completely wrong, contact Remita support to request a correction with supporting identity documents.
Receipt PDF will not open
PDF receipts from Remita are standard PDF files. If the file will not open, try a different PDF reader – Adobe Acrobat Reader is the most reliable. On mobile, most file manager apps open PDFs directly. If the downloaded file is corrupted or zero bytes, delete it and redownload using the Reprint Receipt function with your RRR.
Receipt downloaded but page is blank
This is a browser rendering issue rather than a receipt problem. Try opening the PDF in a different browser or device. If the problem persists, use the Resend Receipt function to receive the receipt by email instead of direct download – the emailed version typically renders correctly across all devices.
Remita Receipt Checklist: What a Valid Receipt Must Show
Before presenting your Remita receipt to any institution, verify it contains all of the following:
| Field | What to Check |
|---|---|
| Payment status | Must show “PAID,” “Successful,” or “Confirmed” – not “Pending” or “Failed” |
| Your name | Must match the name on your institution’s records or your government ID |
| Biller name | Must match the institution or agency you intended to pay |
| Amount | Must match the exact amount the institution specified |
| Date | Must be within the payment window specified by your institution |
| RRR number | Must be present and legible – this is the primary reference for disputes |
| Transaction reference | Separate from the RRR – provides additional confirmation of settlement |
A receipt that passes all seven checks is valid proof of payment for any Nigerian government agency, institution, or biller that accepts Remita payments.
Frequently Asked Questions
How do I get my Remita receipt? Go to www.remita.net, click Confirm Payment or Reprint Receipt on the homepage, enter your 12-digit RRR number, and click Submit. If your payment is confirmed, click Download Receipt to save the official PDF. Alternatively, click Resend Receipt/Invoice on the homepage to have the receipt emailed to the address you provided during payment. You do not need a Remita account or login to retrieve a receipt.
Nigerian Digital Lending Intelligence Report 2026 Best Value
How do I download a Remita receipt after payment? If the payment confirmation screen is still open, click Download Receipt immediately. If you have navigated away, go to remita.net, click Reprint Receipt, enter your RRR, and download the PDF from the confirmation page. Save the file in multiple locations – your downloads folder and your email – as a precaution against future loss.
How do I get a Remita receipt without an RRR? Check your bank statement – the debit narration for a Remita payment typically contains the 12-digit RRR. Check your email inbox for a notification from remita.net sent when you generated the RRR. If neither works, contact Remita support at support@remita.net or 0700-7877678 with your payment date, amount, biller name, and full name. The support team can locate the transaction and issue or redirect the receipt.
How to generate a Remita receipt for payment? A Remita receipt is not generated separately – it is issued automatically when your payment clears and the biller acknowledges receipt of funds. To access it, go to remita.net, click Confirm Payment, enter your RRR, and download the receipt PDF. If you are asking how to generate an RRR for a payment you have not yet made, see our guide: Remita RRR Payment: How to Generate, Use and Pay with Your Remita Retrieval Reference.
How to make payment with Remita RRR? Once you have your 12-digit RRR, pay by debit card on remita.net, through your bank’s internet banking portal, via your bank’s USSD shortcode, at any commercial bank branch in Nigeria, or through the Remita mobile app. After payment through any channel, return to remita.net and use Confirm Payment to verify the transaction and download your receipt.
How do I login to Remita to access my receipts? You do not need to log in. All receipt retrieval functions – Confirm Payment, Reprint Receipt, and Resend Receipt – work as guest functions on remita.net without a registered account. If you have a registered account and want to access your full receipt history, go to remita.net, click Login, enter your credentials at login.remita.net, and navigate to Transaction History on your dashboard.
Can I print my Remita receipt at home? Yes. Once you have downloaded the receipt PDF, open it on any device and print it using any standard printer. The printed version is accepted by all institutions that recognise Remita receipts. If you do not have a printer, most business centres and cybercafés in Nigeria will print a PDF from your phone or email for a small fee – but the download itself is free and you do not need to pay anyone to retrieve the receipt for you.
What do I do if my Remita receipt shows Pending? Wait 30 minutes to two hours – pending status typically resolves automatically as the interbank settlement clears. Do not present a pending receipt as proof of payment. If the status remains pending after 24 hours, contact Remita support at support@remita.net with your RRR and your bank statement showing the debit. Do not attempt to pay again until you have confirmed with Remita whether the original payment completed.
Sources: Silicon Africa, January 2026; Truehost.com.ng, May 2025; Bilsmore.com; Print Education Nigeria, July 2025; BizTable, October 2024; remita.net official platform; helpdesk.remita.net.


The Brands.Ng Editorial Team, led by Augustine Tom, is a multidisciplinary group of researchers, analysts, writers, and industry contributors focused on helping consumers, businesses, investors, and decision-makers better understand Africa's evolving digital economy. Brands.Ng is an African business intelligence and brand discovery platform covering fintech, digital platforms, ecommerce, logistics, payments, consumer technology, business growth, and emerging market trends across the continent. Our work combines market research, industry analysis, consumer insights, regulatory developments, and operational intelligence to evaluate the companies, technologies, and systems shaping how Africans access financial services, digital commerce, online platforms, and modern business infrastructure. Drawing on expertise in business strategy, digital marketing, SEO, brand analysis, market intelligence, and technology research, the editorial team produces independent reviews, comparisons, industry reports, and investigative guides designed to help readers make more informed decisions. Through Brands.Ng Intelligence, we also analyze broader market developments, competitive dynamics, consumer behavior, and regulatory changes affecting businesses and industries across Africa.